

Renovation dust doesn’t stop at the work area. A thorough post renovation cleanup removes dust and debris, cleans floors, windows, fixtures, cabinets, and appliances, and helps make the home ready to use again. It also matters for household safety, since fine dust can linger on surfaces and in the air.
It’s easy to focus on new finishes and overlook the mess left behind. Debris can scratch surfaces, and dust may settle again after a quick sweep. A careful final clean is an important part of wrapping up the renovation.
This guide explains what post-renovation cleaning typically covers, how to clean common surfaces and appliances, and what steps help reduce dust around the home. You’ll also learn what affects professional cleaning costs and how renovation cleanup services can help clear the space so you can enjoy the finished work.
Key Takeaways
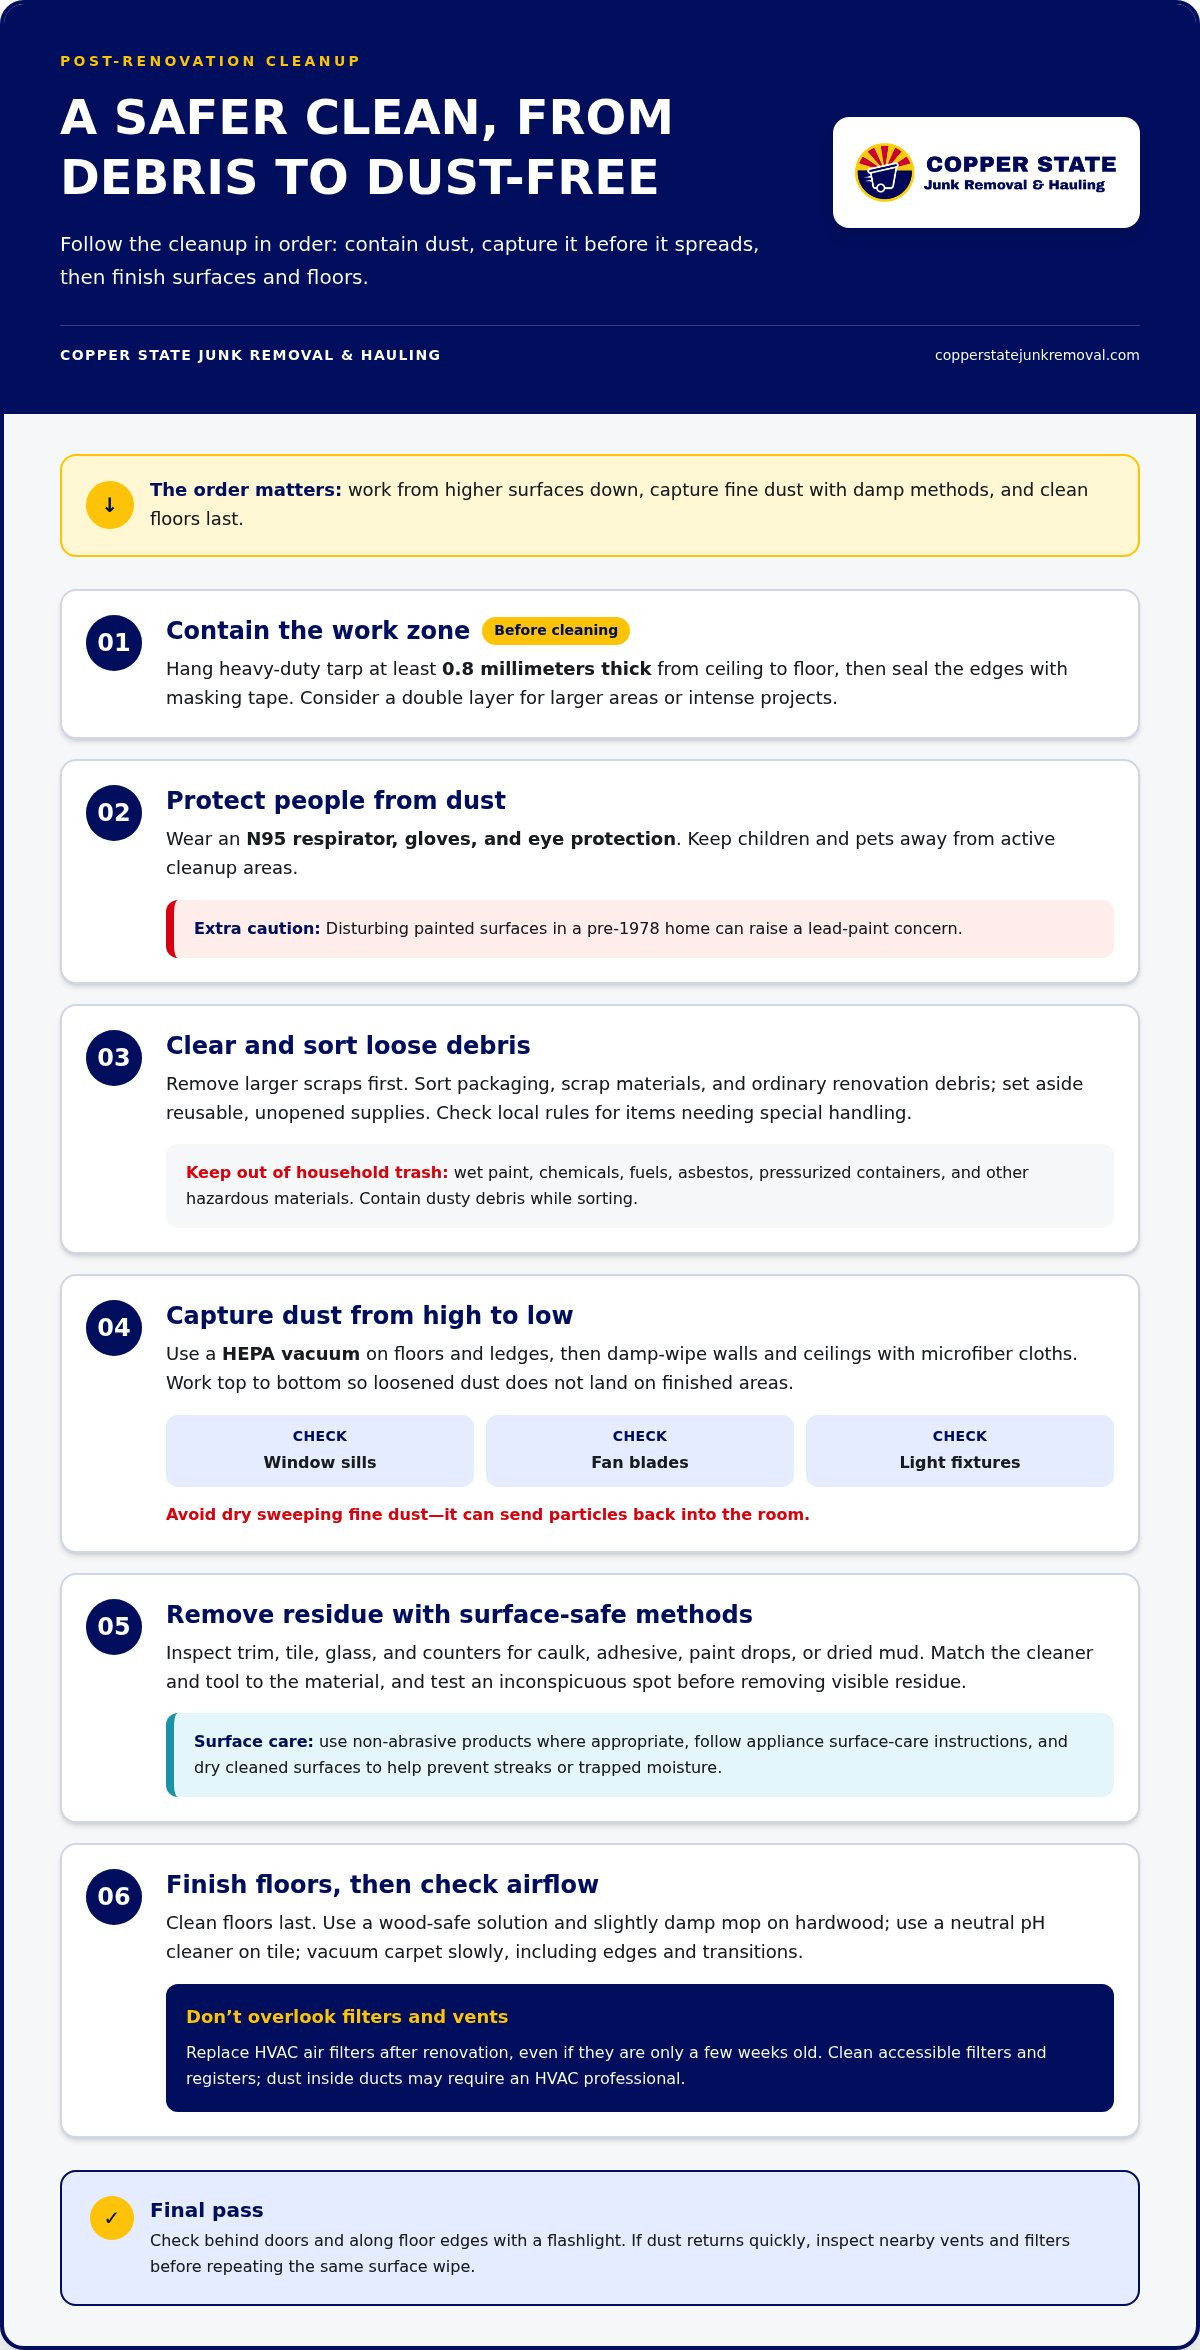
- Work from high surfaces down, and capture fine dust before it spreads or settles on newly finished areas.
- Match cleaning products and tools to each surface to remove residue without damaging floors, fixtures, or appliances.
- Use protective gear and effective filtration to reduce exposure to lingering dust, and pay attention to HVAC filters after the work is done.
- Cleaning costs depend on the size and condition of the space, the level of dust and debris, and the work included in the service.
What does post-construction cleaning include?
A post renovation cleanup should begin by clearing loose debris, followed by vacuuming, wiping high surfaces from top to bottom, and cleaning floors last. The workload depends on the rooms affected, dust buildup, and residue. Useful supplies include a HEPA vacuum, damp microfiber cloths, a flat mop, suitable cleaners, gloves, and eye protection.
Dust and Debris Removal
Remove larger scraps first, then vacuum dust from floors and ledges. During post renovation cleanup, check window sills, fan blades, and light fixtures, where dust can settle again. Use damp microfiber cloths on walls and ceilings, working from top to bottom. The number of affected rooms and the amount of dust determine how much work is involved.
Caulk, Adhesive, Paint, and Mud Removal
Inspect trim, tile, glass, and counters for caulk, adhesive, paint drops, or dried mud. Choose a cleaner and tool suited to each surface, then test an inconspicuous spot before removing visible residue. Use care on new finishes: lifting paint from glass calls for a different approach than removing dried mud from tile.
Construction Waste Disposal
Sort packaging, scrap materials, and ordinary renovation debris before disposal. Set aside reusable, unopened supplies, as some stores may accept returns. Check local rules for items that require special handling. Keep wet paint, chemicals, fuels, asbestos, pressurized containers, and other hazardous materials out of household trash. Contain dusty debris while sorting to limit its spread into cleaned rooms.
Dust Containment and Health Risks
For renovation containment, hang heavy-duty tarp at least 0.8 millimeters thick from ceiling to floor, then seal its edges with masking tape. Consider a double layer for larger areas or intense projects. Fine dust can affect household air. Disturbing painted surfaces in a pre-1978 home can raise a lead-paint concern. Wear an N95 respirator, gloves, and eye protection while cleaning; a HEPA vacuum captures fine particles ordinary vacuums may leave behind.
Cleaning floors, windows, fixtures, cabinets, and appliances
Once loose construction debris is gone, clean from higher surfaces toward the floors. This order helps keep crumbs and residue from landing on areas you’ve already finished. According to Angi’s survey of 1,800 customers, carpets and floors accounted for 19% of commonly cleaned areas after renovation. Give floor material careful attention, since the wrong cleaner can dull or damage a finish.
For hardwood, use a wood-safe solution and a slightly damp mop. Too much water can seep into seams. Tile needs a neutral pH cleaner to lift residue while protecting its finish. Vacuum carpet slowly, paying attention to edges and transitions where dust collects. Check window glass and frames for splashes, then use a suitable glass cleaner and soft cloth. Clean sills and tracks separately, since grit can remain there even after the glass looks clear.
Wipe counters, taps, doorknobs, light switches, and appliance controls with a non-abrasive disinfectant that’s safe for each material. For cabinets, clean door fronts, handles, and interior shelves after removing stored items. Use a soft cloth on stainless steel to avoid scratches. On refrigerators, ovens, and dishwashers, follow the manufacturer’s surface-care instructions and wipe crumbs from accessible edges. Dry surfaces after cleaning to prevent streaks or trapped moisture.
In bedrooms, clean dresser tops, shelving, window sills, and floor edges before replacing bedding or personal items. In bathrooms, dry-clean surfaces first, then use a damp cleaning method so dust doesn’t turn sticky. Remove vent covers, soak them in warm, soapy water, and gently scrub visible buildup with a soft brush. Let each cover dry fully before reinstalling it. These steps help leave fixtures and floors ready for normal use without pushing residue into corners or vents.
Post-renovation cleaning and household safety
A contractor’s usual cleanup standard is “broom-swept”: larger debris is vacuumed, then floors are swept. That may leave fine particles on baseboards, behind doors, or around vents. Unless the construction contract includes post-construction cleanup, the homeowner arranges it. Review the contract, then plan a deep clean beyond the visible construction mess. Angi’s survey of 1,800 customers found walls, ceilings, and woodwork were the most frequently cleaned areas after renovation, at 20.3%.
Protect yourself before handling dusty residue. Wear an N95 respirator, gloves, and eye protection at minimum. Vacuum with HEPA filtration at the end of each work day during renovation; this limits debris buildup before it spreads. During final cleaning, work from higher surfaces down, and avoid dry sweeping fine dust. Damp wiping helps capture particles instead of sending them back into the room. Keep children and pets away from active cleanup areas.
Indoor air needs attention, too. Run a HEPA air purifier on high 24 hours a day, 7 days a week, during renovation cleanup. Open windows and direct fans toward an open door or window to move dusty air outside. Replace HVAC air filters after renovation, even if they’re only a few weeks old. Clean accessible filters and use air purifiers after work ends, since dust can circulate when the heating or cooling system runs.
Check vents and surrounding surfaces before calling the job finished. Dust inside air ducts may require an HVAC professional, as the work calls for specialized experience and safety equipment. Cleaning can remove visible residue from registers, baseboards, and ledges, but ducts need a different approach. Check behind doors and along floor edges with a flashlight. If dust returns quickly, inspect nearby vents and filters before repeating the same surface wipe.
Post-renovation cleaning services and pricing
Consider professional cleaning when a remodel leaves fine dust across several rooms, high ceilings, cabinets, or vents. DIY cleanup may suit a contained project with light, accessible debris and appropriate equipment. The key difference is scope: a quick sweep won’t reach residue on upper surfaces or in overlooked corners.
Professional cleaning typically follows a room-by-room checklist. It may cover reachable walls and ceilings, cabinet fronts and interiors, fixtures, floors, windows, and appliances. The final pass should also address edges behind doors and dust around vents. Compare the checklist with the actual construction mess, so the work covers the surfaces that need attention and avoids paying for unrelated tasks.
Post-renovation cleanup costs vary with the scope of work. Factors include the home’s size, number of rooms, dust and debris levels, surface types, and requested tasks. For example, cleaning residue inside cabinets takes different effort from addressing dust limited to one cleared room. Specialty equipment and additional cleanup steps can also affect the workload.
Before arranging professional cleaning, list the affected rooms and note specific concerns, such as paint spots on windows or dust above cabinets. Remove personal items from work areas and separate reusable supplies from debris. Review the cleanup terms agreed with the renovation team. A broom-swept standard may not include detailed surface cleaning, so compare the agreed scope with your checklist.
- Rooms and surfaces to clean, including ceilings, cabinets, and floors.
- Residue or dust buildup that may need extra attention.
- Tasks included in the quote and any excluded work.
Bring in cleaners when dust spreads beyond a manageable area or detailed work could damage new finishes. For a small project, careful DIY cleaning may be practical if you have the right tools and enough time.
Request a renovation cleanup quote to discuss the work your space needs.
Copper State Junk Removal & Hauling: Hoarder Cleanup
Copper State Junk Removal & Hauling provides Hoarder Cleanup for spaces where accumulated belongings make post-renovation clearing more difficult. If renovation work has exposed a packed room, blocked access to surfaces, or made it difficult to sort possessions, the service can help remove unwanted contents and clear the space. It addresses accumulated belongings, not fine-dust removal or hazardous-material disposal, which require separate cleanup arrangements.
Before arranging a cleanout, decide which belongings should stay and which can go. Clearly mark items, especially in rooms where renovation materials and household possessions are mixed together. This makes sorting easier and helps prevent important belongings from being removed by mistake.
If accumulated belongings are adding to the cleanup workload, contact Copper State Junk Removal & Hauling to discuss Hoarder Cleanup.
Make the Finished Space Feel Like Yours
Use the final cleanup as a fresh start. Before moving furniture back, decide what belongs in the renovated rooms and what no longer fits. This simple reset can make the space easier to use and keep leftover clutter from becoming part of the new setup.
A thoughtful post-renovation cleanup also includes a plan for belongings that need to leave the home. Copper State Junk Removal & Hauling provides Hoarder Cleanup, Assisted Living Cleanouts, and Mattress Removal when accumulated or bulky belongings complicate a transition. Choose the service that fits what is taking up space, then enjoy rooms arranged for the way you want to live.
Ready to clear the way? Contact Copper State Junk Removal & Hauling to discuss the cleanup help you need. A clear space is a great place to begin enjoying your renovation.
Frequently Asked Questions
What does post-renovation cleanup include?
Post-renovation cleanup typically includes removing loose debris, clearing dust from exposed surfaces, cleaning residue, and finishing the floors. Depending on the work area, it may also cover window tracks, cabinet interiors, appliance edges, baseboards, and light fixtures. Consider whether rooms outside the renovation zone need attention. Open doorways and shared hallways can collect dust carried from the work area.
How do you remove construction dust safely from walls, floors, and surfaces?
Work in small zones, starting with the highest surface and moving downward. Use a HEPA-filter vacuum for settled particles, then wipe walls and hard surfaces with a damp microfiber cloth. Fold the cloth to expose a clean section as dust builds up, and replace it when it becomes loaded. Avoid dry brushing, which can send dust airborne, and keep cleaned zones separate from active work areas.
How much does post-renovation cleaning cost in the United States?
Post-renovation cleanup costs depend on the specific work required. Factors include the home’s size, number of rooms, amount and type of residue, surface materials, access, and requested tasks. For example, cleaning a furnished home around Prescott may take more careful work than cleaning an empty room with clear access.
What factors affect the cost of post-construction cleanup?
Scope matters most: cleaning several dusty rooms generally takes more labor than addressing one contained work area. Debris type, delicate finishes, furniture to work around, and hard-to-reach ledges can also affect the workload. In Prescott Valley or Chino Valley, describe the affected rooms and fragile surfaces clearly so the estimate reflects the cleanup work needed.
What health and safety risks should you watch for when cleaning renovation debris?
Fine dust can become airborne during sweeping or scraping, so wear an N95 respirator, gloves, and eye protection. Sharp fragments may also hide in piles of debris. In a home built before 1978, disturbing old painted surfaces can raise a lead-paint concern. Don’t scrape or disturb suspect paint while cleaning; keep people away from that area until it can be assessed appropriately.
How do you clean different flooring types after renovation work?
Match the cleaning method to the floor. Use a wood-safe cleaner and a slightly damp mop on hardwood, keeping excess moisture away from seams. For tile, choose a neutral pH cleaner that lifts residue without harming the finish. On carpet, vacuum slowly in overlapping passes, especially along edges. If the floor has a specialty finish, follow its care instructions before applying a new cleaner.


